
Surfboard Accessory Cleaning and Maintenance
Clean surfboard accessories by removing loose salt and sand with fresh water where the material permits, treating remaining residue with the least aggressive compatible method, and drying accessible surfaces completely. Then inspect fins, hardware, leashes, traction-pad bonds and wax-contact surfaces; persistent cracks, fraying, corrosion, loose hardware or failed bonds are condition problems, not cleaning problems and need separate repair or replacement assessment.
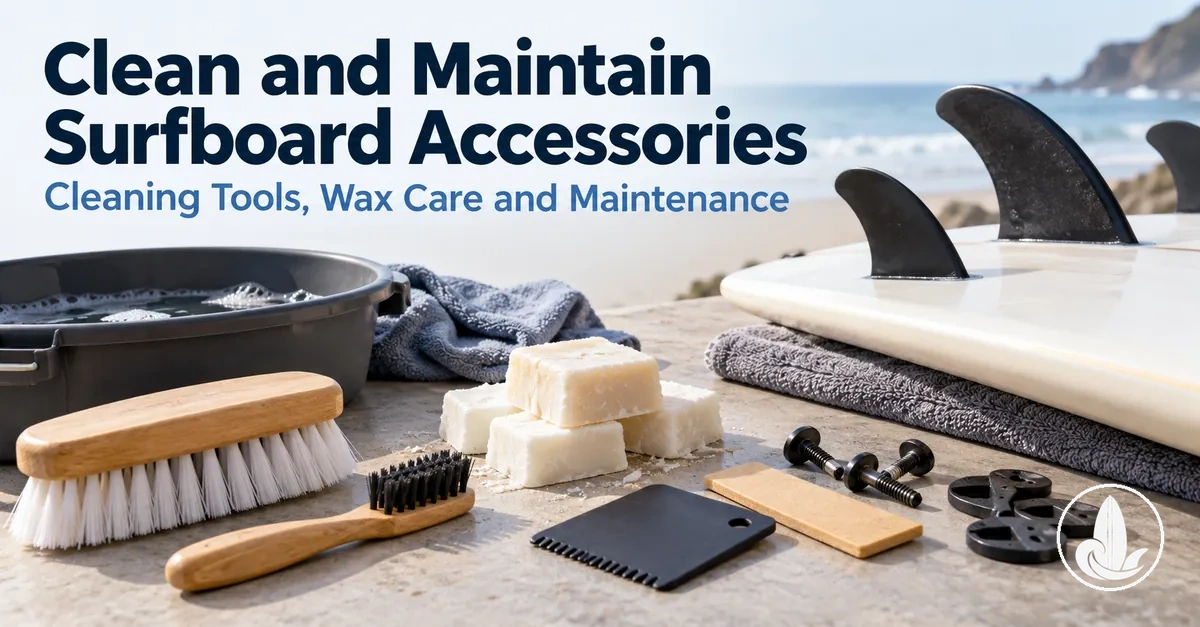
Surfboard accessory care decision guide
Match the next action to the material, the contamination and the accessory's current condition. Start gently and stop treating the issue as cleaning when the underlying part is physically changed.
- Loose salt or sand
- Rinse with fresh water where the material permits, then use a soft cloth or sponge if loose residue remains.
- Wax or persistent residue
- Use a surface-compatible method. For bulk surf wax, use a wax comb or plastic scraper rather than a metal blade.
- Retained moisture
- Drain, wipe and air dry in suitable shaded, ventilated conditions. Reuse when accessible surfaces are dry and no obvious moisture remains.
- Crack, fraying, corrosion, looseness or failed bond
- Clean only enough to inspect the part. Cleaning cannot restore damaged material, hardware, stitching or an adhesive bond.
This guide covers routine accessory care rather than board repair or purchase selection. When a material's tolerance is uncertain, use the accessory manufacturer's care guidance before choosing a cleaner, water temperature, heat source or abrasive tool.
Table of Contents
Prepare Surfboard Accessories for Safe Cleaning
Prepare surfboard accessories for safe cleaning by identifying each accessory material, condition, contamination, and accessible surface before applying water or a cleaning tool.
Check fins and hardware, leash components, and bonded surfaces for loose parts, visible damage, or weakened edges.
Match the cleaning method to the material and its current condition rather than assuming one method suits every accessory.
Salt, sand, and wax residue create different cleaning needs, while existing damage can make otherwise routine cleaning inappropriate.
Inspect residue-prone areas such as fin and hardware contact points, leash swivels, and traction-pad edges before choosing a cleaning approach.
Visible damage, loose hardware, or a lifting bonded surface should be assessed before aggressive cleaning; this checklist is a pre-cleaning verification step, not a repair assessment.
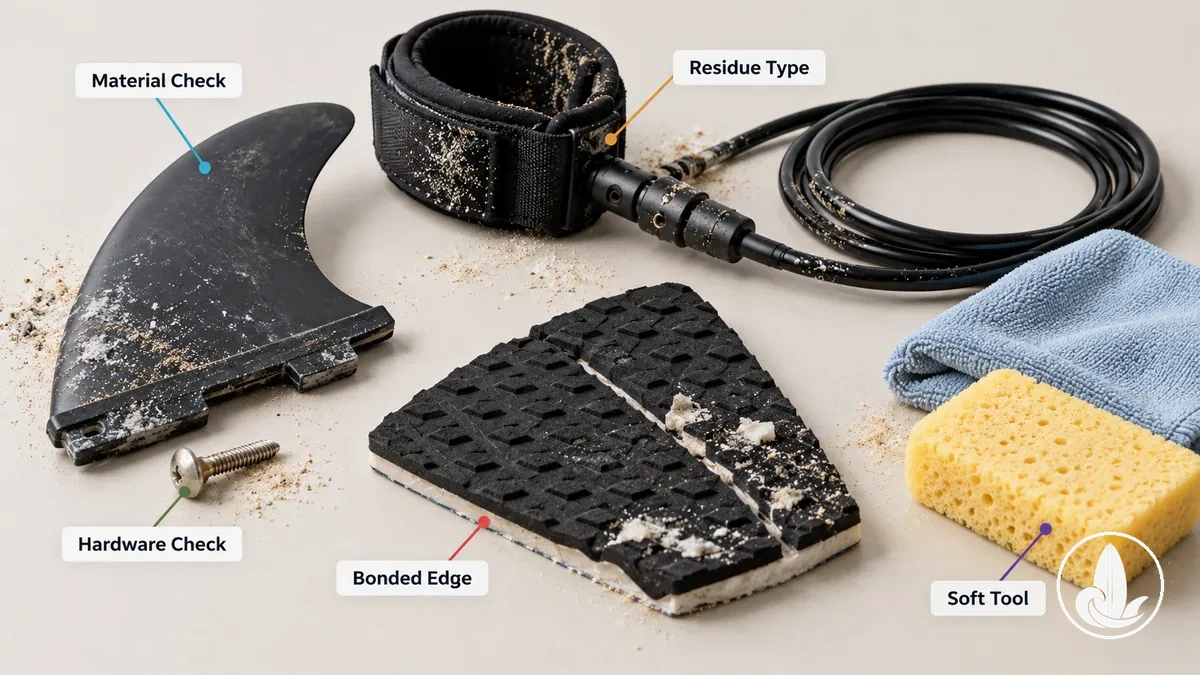
- Material or finish: Identify the accessory material and exposed finish, then match the cleaning method to that construction and any known manufacturer care guidance.
- Contamination: Identify salt, sand, wax residue, or other buildup so the cleaning approach addresses the residue without unnecessary abrasion.
- Hardware condition: Check fins, screws, fin-box contact areas, leash swivels, and other hardware for looseness or visible damage before cleaning around them.
- Bonded surfaces: Inspect traction pads and other bonded areas for lifting edges or surface damage; avoid aggressive cleaning where the bond or surface is already compromised.
- Cleaning tool: Select a soft cloth or sponge only when it suits the identified material and contamination; harder tools require separate compatibility with the surface.
- Care constraints: Check manufacturer-specific instructions when known before selecting a cleaner, water temperature, or tool where the material's cleaning tolerance is uncertain.
Clean Salt, Sand and Residue from Surfboard Accessories
Rinse surfboard accessories with fresh water to clear loose salt and sand before treating residue that needs more focused cleaning.
Use a soft cloth or sponge for gentle cleaning, adding mild soap only when it suits the accessory material and the remaining buildup.
Rinse again after any suitable cleaning product, then dry the accessory fully.
Start with loose contamination and gentle contact before moving to residue-specific cleaning.
Loose salt and sand can remain on the surface while sticky or wax residue may need a different cleaning action.
Clearing loose particles first leaves the affected surface ready for gentle wiping without mixing them into the remaining buildup.
More persistent residue can then be treated with a material-compatible method, followed by a fresh water rinse where appropriate.
The exact cleaner, cleaning tool, pressure, and water conditions should match the material, bonded surfaces, residue type, and manufacturer care guidance.
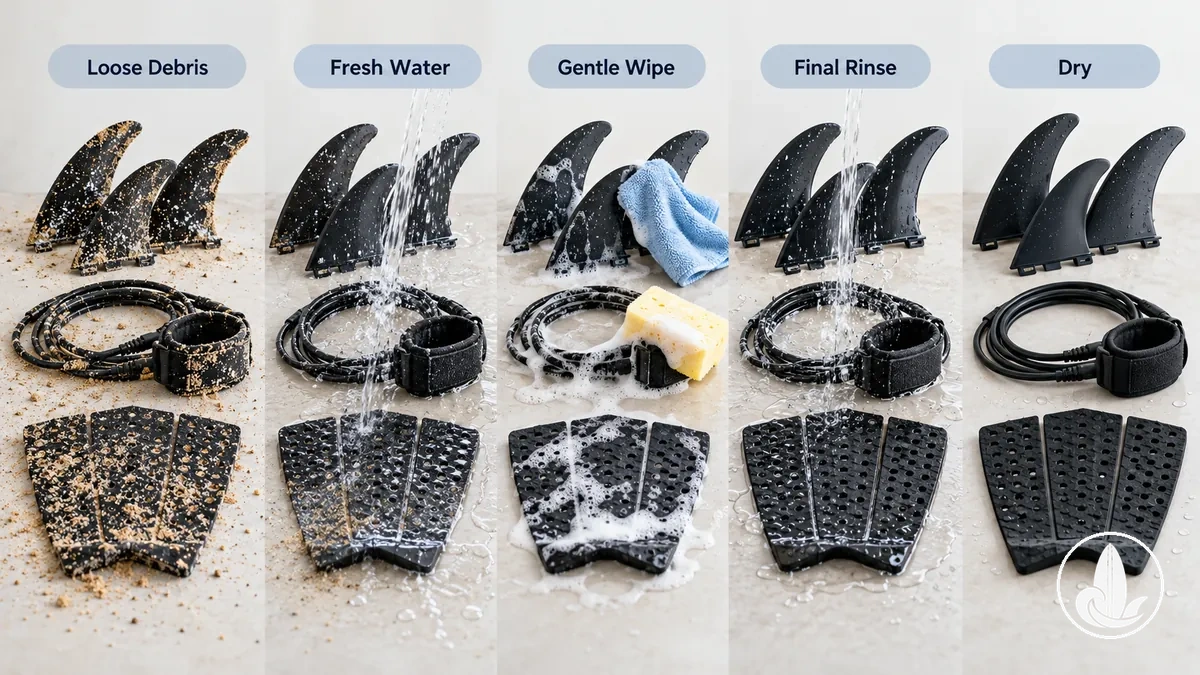
- Clear loose contamination: Rinse salt, sand, and other loose debris from the affected accessory surface with fresh water where the material permits. Continue when loose particles are no longer visible on the area being cleaned.
- Wipe remaining surface residue: Use a soft cloth or sponge with gentle contact on residue that remains after rinsing. Move to targeted cleaning only when the remaining buildup does not lift with gentle wiping.
- Clean persistent buildup: Use mild soap only when it is compatible with the accessory material, bonded areas, and manufacturer guidance. For wax residue or other persistent buildup requiring a different method, use an approach suited to that specific surface rather than increasing abrasion.
- Rinse the cleaned surface: Rinse again with fresh water where appropriate until loosened residue and suitable cleaning product are cleared from the surface.
- Dry the accessory: Allow the cleaned accessory and its accessible surfaces to dry fully before moving to later condition checks.
Clean Fins and Fin Hardware
Rinse surfboard fins with clean water to clear salt and sand, then scrub gently with a soft cloth or brush where buildup remains.
Inspect the fin surface as you clean it rather than using a fixed soaking or chemical method for mineral buildup.
Check the fin box contact area for trapped debris.
Give particular attention to fin bases and accessible fin hardware, where deposits can collect.
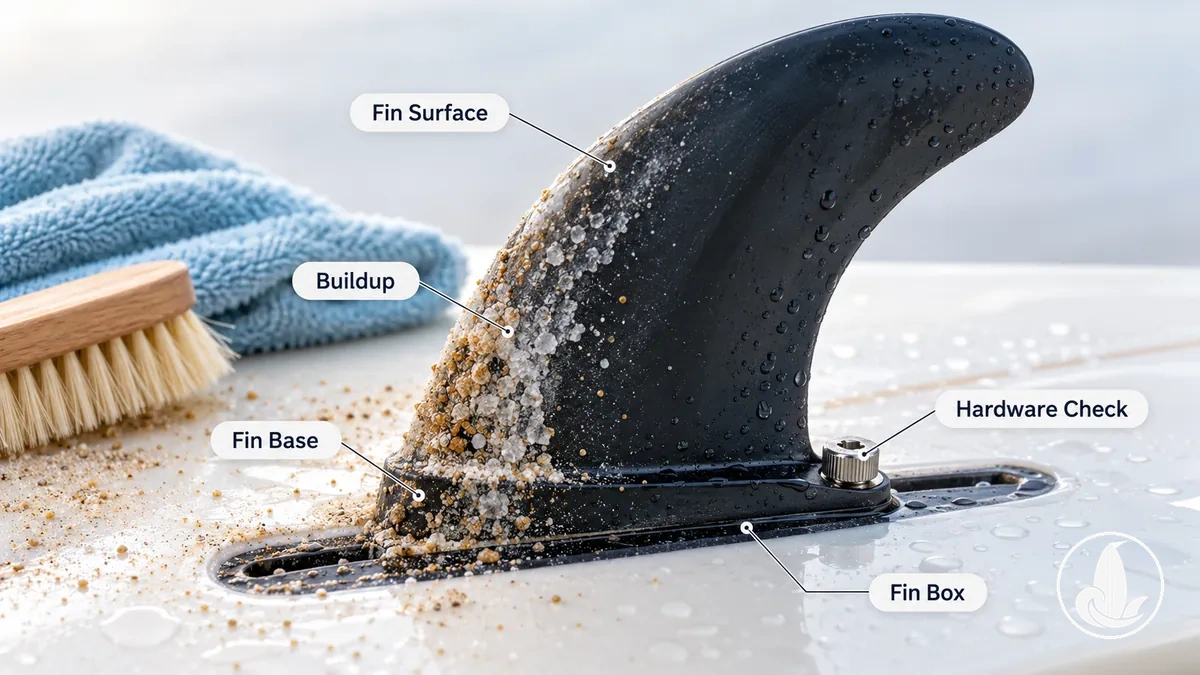
Visible deposits or looseness around screws and other accessible hardware call for cleaning followed by a condition check.
Routine fin maintenance should leave accessible surfaces clear enough to inspect and the fin box free of loose debris.
Cracks, damaged hardware, or abnormal looseness move the issue beyond routine cleaning and require separate assessment.
- Fin surface: Rinse away loose salt and sand, then scrub gently where residue remains; stop when the surface is clean enough for a visual condition check.
- Fin base and fin box: Clear accessible sand, salt, and other loose debris from contact areas, then check that no visible buildup remains.
- Screws and hardware: Check accessible screws and fin hardware for buildup, damage, or looseness after cleaning; abnormal movement or damaged hardware requires separate assessment.
- Final rinse and dry: Rinse loosened debris from the cleaned areas with clean water where appropriate, then allow the fin and accessible mounting areas to dry for a final condition check.
Rinse and Clean the Surfboard Leash
Rinse the surfboard leash with fresh water to wash salt and sand from the cuff, cord, swivels, and rail saver.
Check these areas for trapped grime and wax residue while rinsing.
Use mild soap with a soft cloth only when it suits the leash material and residue remains after rinsing.
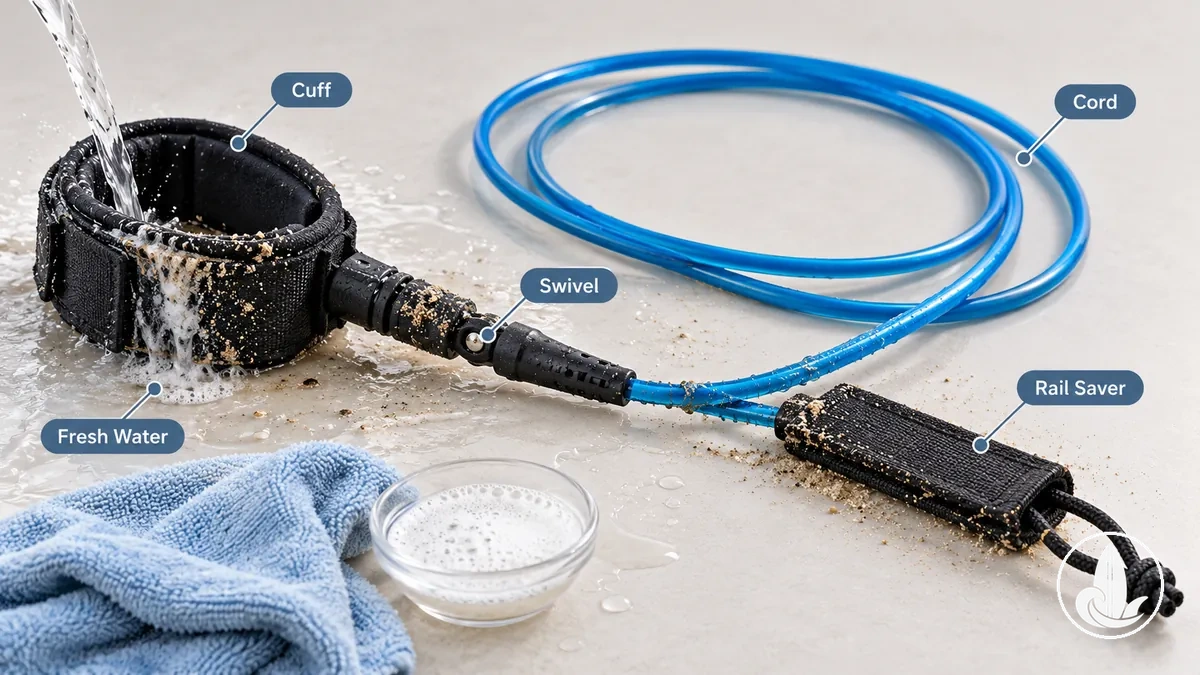
Cleaning exposes the leash surfaces for a quick condition check but does not reverse fraying, stretching, stitching damage, or hardware wear.
Leash care and inspection should treat removable wax residue and grime as contamination, while fraying, stretching, stitching damage and hardware wear remain condition issues that cleaning does not restore.
- Rinse with fresh water: Wash salt, sand, and loose residue from the surfboard leash, including the cuff, cord, swivels, and rail saver.
- Clean remaining residue: Wipe persistent surface grime or wax residue gently with a soft cloth and mild soap when suitable for the leash material, then rinse away the loosened residue and soap.
- Inspect the leash parts: Check the cuff, cord, swivels, and rail saver as the surfaces become clean, keeping signs of physical wear separate from removable contamination.
- Dry completely: Allow the rinsed surfboard leash and its accessible components to dry completely before the cleaning task is considered finished.
Clean Traction Pads Without Weakening the Adhesive
Clean a traction pad by clearing sand and dirt from the grip surface, then wiping remaining residue gently.
Use a clean cloth with light moisture or a material-compatible cleaner where needed.
Keep gentle cleaning focused on the grip surface to help avoid unnecessary stress on the bonded edge and adhesive bond.
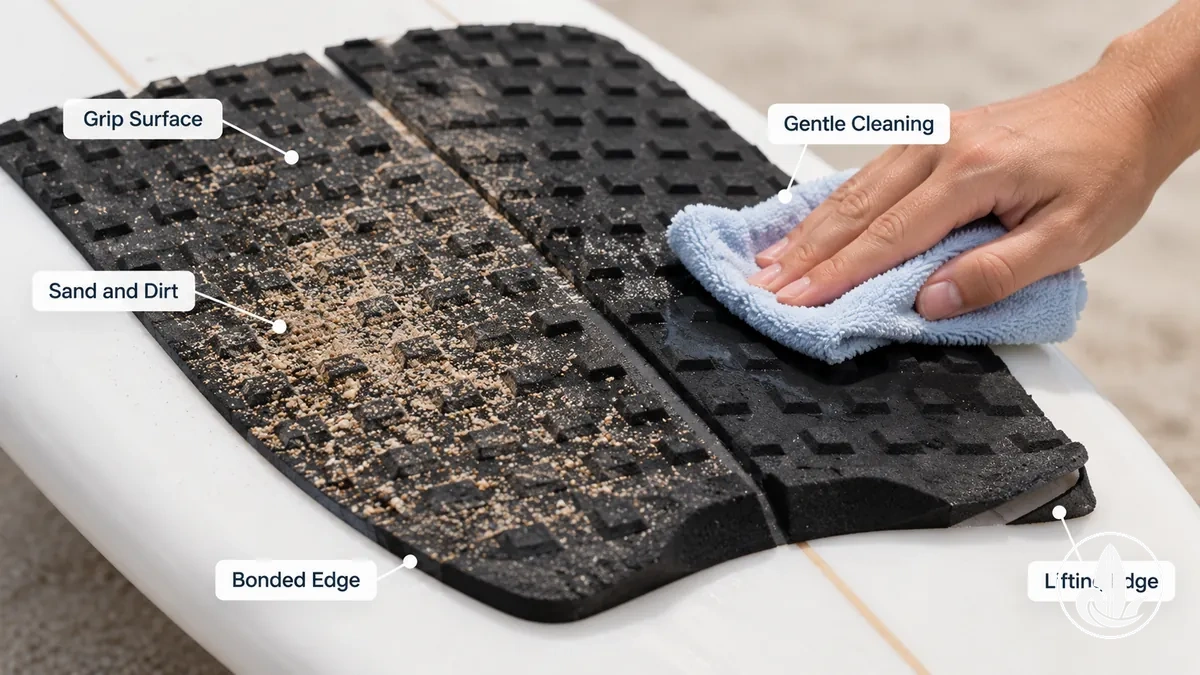
- Clear loose sand: Brush or wipe loose sand and dirt from the textured grip surface before treating residue that remains.
- Clean the grip surface: Wipe residue with a clean cloth using light moisture and gentle cleaning suited to the pad material, adhesive, coating, and board-contact surface.
- Dry and observe the edge: Let the traction pad dry, then observe the bonded edge for a lifting edge or other visible change in the adhesive bond.
Surface cleaning and work on a failing adhesive bond are different maintenance tasks.
Traction pad maintenance should treat a lifting edge or degraded adhesive bond as a condition issue outside routine grip-surface cleaning.
Surface cleaning versus bond work:
- Surface cleaning: Clear sand, dirt, and residue from the grip surface with gentle contact, then let the cleaned area dry.
- Bond work: A lifting or degraded bonded edge indicates an adhesive condition that routine surface cleaning does not correct.
Remove Old Surf Wax and Remaining Residue
Remove old surf wax in two stages: soften and scrape the bulk wax, then clean the thin wax residue left behind.
Use a wax comb or plastic scraper rather than a metal blade on the deck surface.
Keep bulk wax removal separate from residue cleanup so each method can match the surface material.
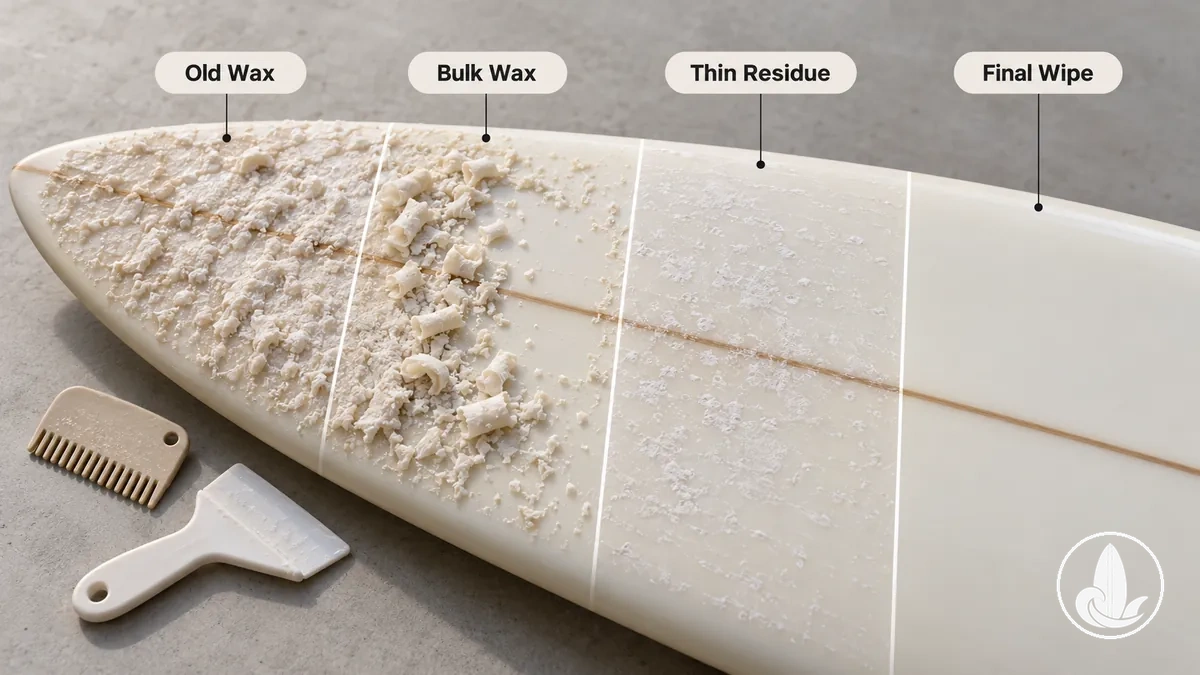
- Prepare the surface: Support the board on a stable surface and identify the deck surface material and construction before choosing how to soften the wax.
- Soften the old surf wax: Use a material-appropriate softening method consistent with manufacturer guidance, stopping when the bulk wax is workable enough for controlled scraping.
- Scrape the bulk wax: Work a non-metal wax comb or plastic scraper across the softened buildup until the bulk wax is cleared and only thin residue remains.
- Clean the remaining residue: Treat the thin wax residue with a compatible wax remover or wiping method suited to the surface material, then wipe and check the deck surface for remaining film.
Softening methods and residue cleaners can affect deck surfaces differently according to the surface material, coating, and construction.
Surf wax cleaning and removal should therefore match any wax remover and softening method to the deck material and manufacturer guidance where available.
Direct heat, solvents, and alcohol-based cleaners should not be assumed suitable for every deck surface.
Bulk wax versus thin residue:
- Bulk wax: Soften old wax by a surface-compatible method, then scrape the main buildup with a wax comb or plastic scraper.
- Thin residue: Address the remaining film with a surface-compatible cleanup method, then wipe and check the deck surface.
Dry Surfboard Accessories Completely After Cleaning
Dry surfboard accessories completely after cleaning so moisture does not remain after the final rinse.
Drain excess water where appropriate, wipe accessible surfaces, and let the accessory air dry before reuse.
Complete drying helps reduce conditions that can contribute to corrosion, odor, or moisture-related deterioration.
Check crevices and hardware carefully because retained water can remain less visible in these areas.
- Drain excess water: Shake or position the accessory so loose water can drain from crevices, a leash cuff, swivel areas, and accessible hardware where appropriate.
- Wipe accessible moisture: Use a clean cloth to dry exposed surfaces and around hardware, recesses, and the edges of a bonded surface without forcing or disturbing the bond.
- Air dry: Let the accessory air dry in a suitable shaded, ventilated setting. Choose the drying conditions according to its material and construction rather than treating direct heat or prolonged sun exposure as a universal method.
- Verify before reuse: Check the cuff, swivel, hardware, crevices, and bonded surfaces for obvious retained moisture before returning the accessory to normal use.
Moisture can leave exposed surfaces before water held around hardware, crevices, or layered components has cleared.
Allow these moisture-prone areas to air dry in shade with suitable ventilation, while following material-specific care guidance where applicable.
An accessory is ready for reuse when its accessible surfaces are dry and no obvious retained moisture remains, rather than after a fixed drying time.
Avoid Cleaning Methods That Can Damage Accessory Materials
A cleaning method can lift residue yet still be unsuitable for the accessory material, coating, or adhesive bond.
Check material compatibility before using a solvent, alcohol, acetone, direct heat, abrasive tool, or metal scraper.
Plastic, metal, fabric, foam, adhesives, coatings, and board-contact surfaces can respond differently to the same exposure.
The main risk categories are chemical incompatibility, heat-related stress, scraping, and excessive abrasion.
| Method or exposure | Material or component | Potential risk | Safer decision rule |
|---|---|---|---|
| Strong solvent | Plastic, foam, adhesive bond, coating, or board-contact surface | An incompatible solvent may soften, discolor, weaken, or otherwise affect the exposed material or bond. | Confirm compatibility with the specific material and manufacturer guidance; otherwise choose a milder, material-suitable cleaning method. |
| Alcohol or acetone-type cleaner | Coatings, plastics, adhesives, and finished surfaces | An incompatible cleaner may affect the surface or adhesive, even when it is effective at dissolving residue. | Use it only when compatibility with the specific surface is established; otherwise choose fresh water, mild soap, or another compatible method where appropriate. |
| Direct heat | Foam, plastic, adhesive bond, or bonded surface | Heat beyond what the material or construction tolerates may deform heat-sensitive material or weaken a bond. | Use material-appropriate drying or softening conditions consistent with manufacturer care guidance instead of treating direct heat as a general cleaning method. |
| Metal scraper or hard scraper | Coating, deck surface, plastic, or other finished surface | Hard scraping may scratch, gouge, or abrade the contacted surface. | Use a non-metal tool suited to the surface when scraping is required, with only the contact needed to address the residue. |
| Aggressive abrasion | Fabric, foam, coating, plastic, or textured surface | Excessive abrasion may wear the surface, alter its texture, or affect a coating. | Start with fresh water, a soft cloth, mild soap where compatible, or another less aggressive method suited to the contamination and material. |
Choose a safer method by matching the cleaner, tool, heat exposure, and abrasion level to the affected material or component.
Cleaning effectiveness alone does not establish material compatibility, especially around a coating or adhesive bond.
When compatibility is uncertain, check manufacturer care guidance rather than assuming a solvent, heat source, or abrasive method has the same effect across materials.
Prefer the least aggressive method known to suit both the material and the residue being treated.
Inspect Surfboard Accessories for Wear and Damage
Inspect cleaned surfboard accessories for wear and damage by checking each part for changes in condition that could affect routine maintenance.
Look for cracks, corrosion, fraying, loose hardware, a worn surface, or a bond change in the part where each sign appears.
Compare visible changes with the component's normal shape, attachment, movement, and surface condition rather than judging by appearance alone.
Cleaning can make signs easier to see when salt, sand, wax, or other residue previously covered the surface.
A visible mark becomes a useful maintenance signal when its location, progression, or functional effect suggests more than a cosmetic change.
A crack near a fin or fin box, fraying on a leash cord, corrosion around hardware, or lifting at a bonded edge can justify closer assessment, but these signs do not have identical significance across materials and components.
Cosmetic discoloration or superficial marks should remain separate from changes that affect attachment, movement, bonding, or material integrity.
Use the following condition checklist to distinguish routine-care findings from signs that need closer assessment.
- Fins and fin box: Inspect the fin, base, and fin-box area for cracks or visible changes around contact points; a crack at a mounting or loaded area warrants closer assessment rather than routine care alone.
- Hardware: Check screws and other accessible hardware for corrosion, damage, or looseness; loose hardware or corrosion affecting the connection warrants closer assessment of the affected component.
- Leash cord: Inspect the cord for fraying, cuts, stretching, or other visible wear; deterioration that changes the cord's material condition calls for closer assessment.
- Leash cuff and swivel: Check the cuff, stitching, and swivel for wear, fraying, unusual looseness, or restricted movement; functional changes should be assessed separately from surface grime or cosmetic marks.
- Traction-pad surface: Observe the grip area for a worn surface, tears, or material deterioration; changes that alter the pad's texture or integrity are condition findings rather than remaining contamination.
- Bonded edges: Check traction pads and other bonded surfaces for a bond change such as lifting, separation, or movement at the edge; a changing bond warrants closer assessment instead of more aggressive cleaning.
Check for Cracks, Corrosion, Fraying and Loose Hardware
Check cracks around the fin and fin box, corrosion on metal hardware, fraying along the leash cord or stitching, and loose hardware such as a screw or swivel connection.
Assess each sign by its location, extent, progression, and functional effect on the component's condition.
- Cracks: Inspect the fin, fin base, and fin box for visible cracks, especially near mounting or contact areas. Note whether a crack is superficial or appears to extend, move, or affect the connection; a progressing or function-affecting crack warrants closer assessment.
- Corrosion: Observe screws, swivels, and other metal hardware for corrosion, pitting, or surface breakdown. Corrosion that is progressing or affecting a connection, thread, or moving part calls for closer assessment of that hardware.
- Fraying: Check the leash cord, cuff, and stitching for fraying, cuts, or fibres separating from the surrounding material. Fraying that spreads or changes the integrity of the cord or stitching should be treated as a condition issue requiring closer assessment.
- Loose hardware: Check each accessible screw, fin connection, and swivel for unexpected movement or looseness without forcing the component. Loose hardware that changes attachment or normal movement requires closer assessment rather than a pass or fail judgment based on appearance alone.
Recognize Damage That Routine Maintenance Cannot Correct
Routine maintenance can remove surface residue, but it cannot restore physically damaged material or lost function.
Cracks, fraying, corrosion, loose hardware, a failed bond, or another persistent damage condition should be judged by location, severity, progression, and functional effect.
A cleaner appearance does not restore structural integrity when the underlying condition remains.
The decision boundary is whether the issue is removable surface contamination or a persistent physical or functional change.
- Surface residue: If salt, sand, wax, or grime is removable without revealing physical damage, cleaning can plausibly address the condition within routine maintenance.
- Cracks: If a crack remains after the surface is clean, routine maintenance cannot repair the cracked material; its location, progression, and functional effect determine whether repair assessment is appropriate.
- Fraying or corrosion: If fraying remains in a cord or stitching, or corrosion has altered metal hardware, cleaning may expose the condition but cannot restore material already lost or deteriorated; its extent and functional effect determine the next assessment path.
- Loose hardware: If loose hardware reflects damaged threads, a damaged connection, or persistent movement rather than removable contamination, cleaning cannot correct the underlying condition; the affected connection requires further assessment.
- Failed bond or functional change: If a bonded component remains separated, or an accessory no longer attaches, moves, or functions as intended after routine care, the condition moves beyond cleaning toward repair assessment or replacement assessment.
Persistent damage moves beyond cleaning when the underlying material, connection, or bond remains physically changed after surface contamination is removed.
Its severity and functional effect determine whether the condition should move into repair accessories and tools assessment rather than continued cleaning.
Persistent damage or a functional change may also require replacement assessment when the condition cannot plausibly be resolved through routine care or an appropriate repair path.
The component's condition, function, and repairability provide the decision context for when accessories need replacement.
Follow a Regular Surfboard Accessory Care Routine
Follow a regular surfboard accessory care routine by combining immediate care after every session with deeper cleaning and condition checks when exposure, buildup or wear makes them necessary.
After every session involving saltwater exposure, use fresh water to rinse applicable accessories and let them dry according to their material and construction.
Care After Every Surf Session
After every surf session, rinse exposed surfboard accessories with fresh water to remove salt and loose contamination.
Check for remaining sand or visible residue and obvious damage, then leave each cleaned accessory to dry completely.
- Rinse: Use fresh water on exposed accessories after the session to rinse away salt and loose contamination from accessible surfaces.
- Remove visible residue: Check for sand and visible residue after rinsing; use a soft wipe where suitable if contamination remains on the surface.
- Check condition: Make a quick condition check for obvious damage, unusual looseness, or other visible changes, with closer attention after an unusual impact.
- Dry: Let rinsed accessories dry completely according to their material and construction, with no obvious retained moisture remaining on accessible surfaces.
Periodic Deep Cleaning and Condition Checks
Periodic deep cleaning is warranted when normal after-session care leaves recurring buildup or repeated exposure makes a closer condition check useful.
Salt and residue can remain around less accessible contact areas, while wear can become clearer after accumulated contamination is removed.
Cleaning intensity should match the material, residue type, exposure, and observed condition.
Use buildup, repeated exposure, or a visible condition change as the trigger rather than a calendar date.
- Hardware area: When salt or residue accumulates around accessible hardware, clean the affected area with a material-compatible method, then inspect the cleared surfaces for buildup or wear that needs closer assessment.
- Fin contact point: When sand, salt, or residue remains around a fin base or fin contact point, clear the accumulation and inspect the exposed contact area so its condition can be reassessed.
- Leash component: When grime or residue persists around a cuff, cord, swivel, or other leash component, clean the affected surface and inspect it for wear that was obscured by the buildup.
- Traction-pad edge: When contamination collects around a traction-pad edge, clean the accessible surface gently and check the bonded edge for visible wear or a condition change.
- Wax residue: When persistent wax residue remains after routine care, use a surface-compatible removal method and reassess the cleaned area for remaining film or an underlying surface change.